Android Test Automation: Why & How You Can Automate Testing
Android test automation is the process of using software tools and scripts to execute tests on Android applications automatically.


Since Android has a wide range of devices and OS updates are frequent, ensuring consistent quality poses a challenge.
Fragmentation alone introduces thousands of combinations across screen sizes, manufacturers, hardware specs, and software builds.
Add in real-world conditions like incoming calls, low battery, and shifting network strength, and manual testing simply can’t scale.
That’s where automation becomes essential.
Android QA automation catches bugs earlier, reduces regressions, and ensures a stable user experience across the fragmented Android landscape.
This need for consistency is more important than ever. One in five app users expects key tasks to be completed within five seconds, while nearly two-thirds experience app issues weekly.
Crashes, slow startups, frozen screens, and unresponsive buttons are all common frustrations that drive users to uninstall apps after repeated poor experiences.
Android teams need a test automation strategy that’s reliable, scalable, and built for the real world to meet rising quality standards while maintaining speed.
This guide walks you through everything you need to know to get started and scale with Android test automation. By the end, you’ll have a clear roadmap for building a scalable, efficient, and future-ready Android testing strategy.
TL;DR
- Manual testing doesn’t scale in a fragmented Android ecosystem.
- Crashes lead to uninstalls—automated testing helps ensure reliability.
- Automation increases test coverage, accelerates feedback, and reduces costs.
- AI enhances automation through self-healing tests, flaky detection, and performance insights.
- CI/CD integration is key to running tests early and often, improving release velocity and product quality.
Why Automate Android Testing?
Manual testing doesn’t scale well, especially for Android. With new devices hitting the market almost daily and rapid development cycles, staying ahead is tough.
At the same time, users expect fast and smooth experiences, and automation has become necessary to meet these demands.
Here are some reasons why Android test automation is crucial:
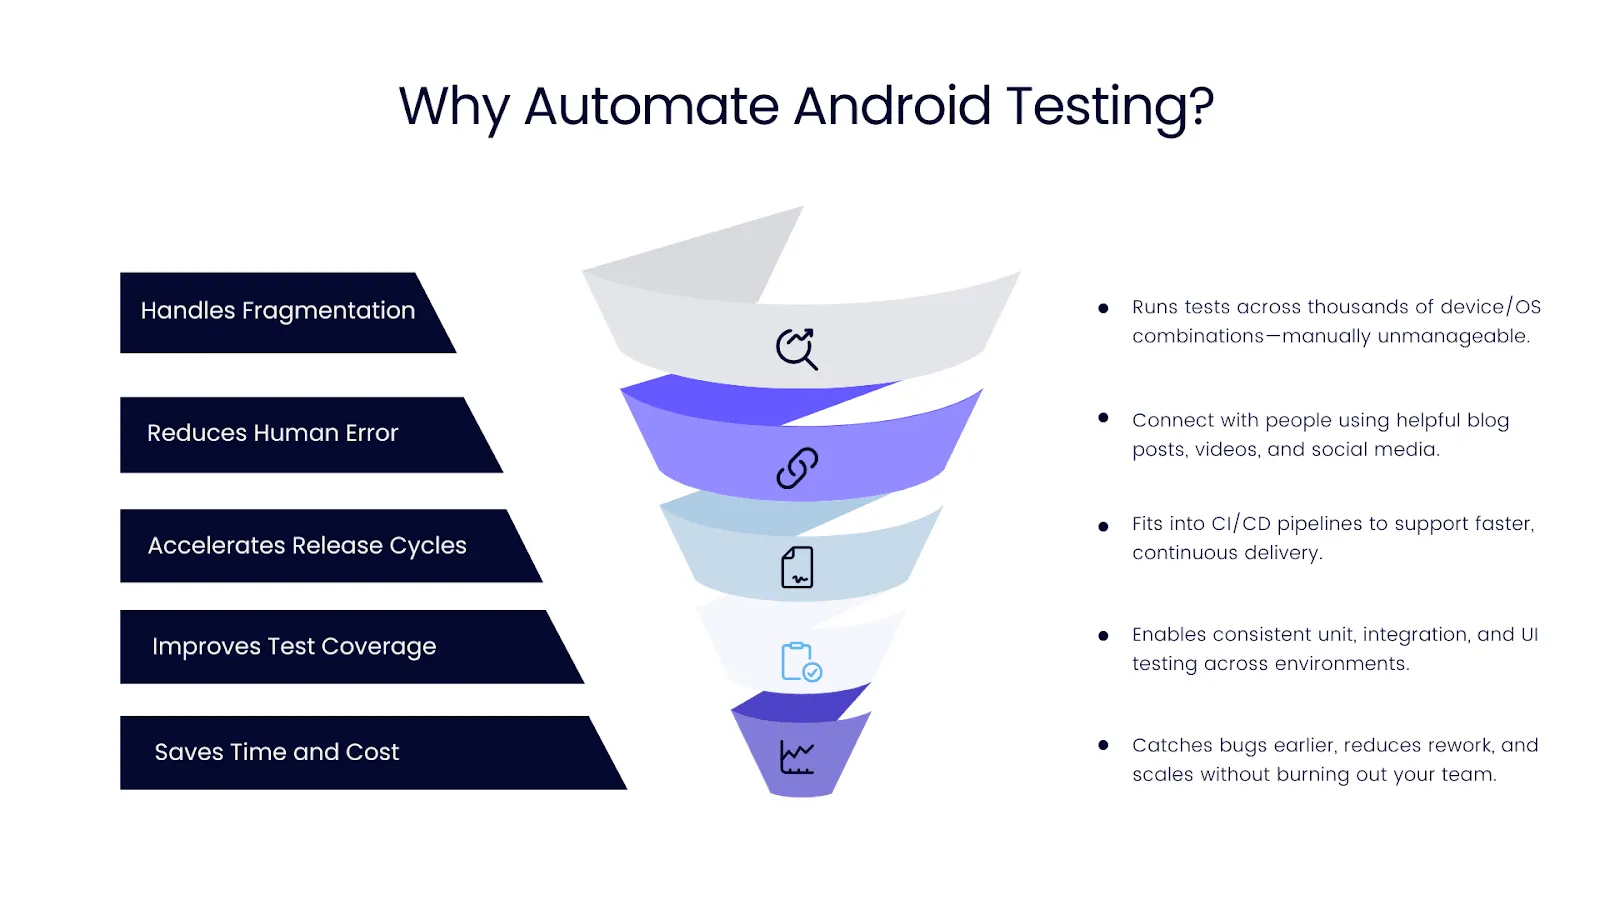
Fragmentation makes manual testing unsustainable
Android runs on thousands of devices from hundreds of manufacturers. Each comes with its own screen size, hardware specifications, and OS version.
This extreme range of options, often referred to as Android fragmentation, makes it nearly impossible to manage testing manually.
That’s where automation steps in. Automated tests can run on emulators or real devices in parallel. They help you catch device-specific issues early, without increasing testing time.
Manual testing is slow and error-prone
Repeating the same test steps across builds and devices leads to tester fatigue. Fatigue leads to mistakes, which is how bugs slip through.
Automated testing solves this by removing human error from the equation. Once your tests are written, they run the same way every time.
Unlike humans, they do not skip steps, get tired, or overlook details, resulting in more reliable results in less time.
Faster releases need faster testing
In agile development environments, release cycles are short and frequent. Manual testing often becomes a bottleneck, slowing down deployments and reducing team speed.
Automation helps you keep pace. By integrating tests directly into CI/CD pipelines, you can run them on every build.
That means issues are caught immediately, and releases stay on track without compromising quality.
Automation gives you better test coverage
Manual testing has its drawbacks. There’s only so much you can do with limited time and resources.
With automation, you can consistently run unit, integration, and UI tests across different environments.
This expands your test coverage and increases confidence in every release. Even better, automated tests can run overnight or on demand.
Automation saves time and money in the long run
Yes, setting up automation takes upfront effort. However, the long-term benefits far outweigh the initial investment.
You spend less time repeating the same test cases and more time building better features. You catch bugs earlier—when they’re cheaper to fix—and reduce costly post-release issues.
In the end, automation improves product quality and helps your team scale efficiently without burning out.
Setting Up an Android Test Automation Environment
Automating Android testing starts with building the right foundation. Before you can run your first test, you need to set up your tools, choose a framework, configure your devices or emulators, and write that first line of test code.
A stable environment is key whether you’re testing locally or integrating with a CI/CD pipeline.
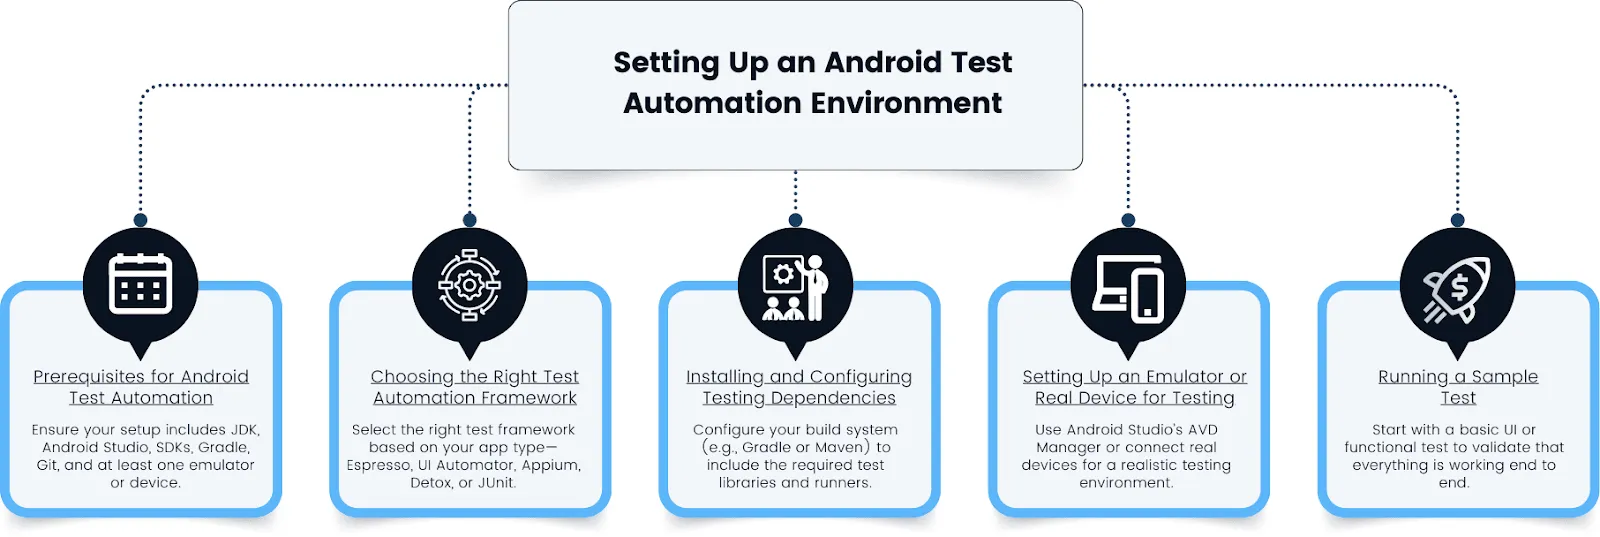
Prerequisites for Android Test Automation
Before we start Android automation testing, ensure your setup checks all the essential boxes. These Android automation tools and skills will help you build and maintain a reliable test environment:
- Java Development Kit (JDK 11+): Most Android test frameworks require Java. Ensure your JDK version is compatible with your chosen tools.
- Android Studio: The official IDE for Android development, bundled with tools like the AVD Manager, SDK Manager, Gradle support, and UI Inspectors.
- Android SDK and Build Tools: Install the appropriate Android API level for your app and the latest build tools to compile and test your project.
- Gradle: Gradle manages project builds and dependencies. You’ll use it to add test libraries, compile test code, and run tests.
- Git (optional but recommended): For version control, code collaboration, and integrating with CI tools like GitHub Actions or GitLab CI.
- Basic Kotlin or Java knowledge: Most Android automation testing is written in Kotlin or Java. Understanding the syntax and structure will help in writing and debugging test scripts.
- Device or emulator access: You’ll need at least one emulator or real device to execute UI or integration tests.
- Optional: Continuous Integration (CI) tool: If you plan to run tests automatically on pull requests or nightly builds, set up Jenkins, GitHub Actions, or Bitrise.
Choosing the Right Test Automation Framework
Your choice of framework depends on your app, tech stack, and test goals.
Here’s a quick overview of popular options:
Installing and Configuring Testing Dependencies
Once you’ve chosen your framework, configure your build system to include the necessary libraries.
For Espresso (Gradle example):
Add these to your build.gradle (app-level) file under dependencies:
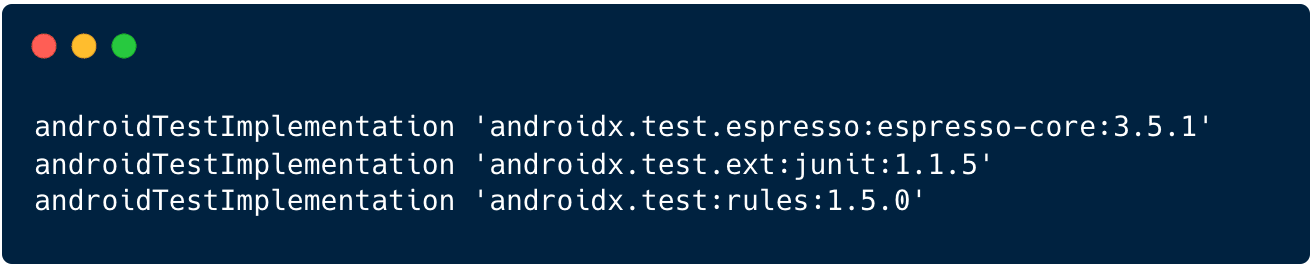
Also, ensure your Gradle file includes:

Run ./gradlew sync to apply the changes.
For Appium:
Appium is set up outside Android Studio. You’ll need:
- Node.js and npm (for installing Appium CLI)
- Appium Desktop (optional GUI) or Appium server
Install Appium globally:

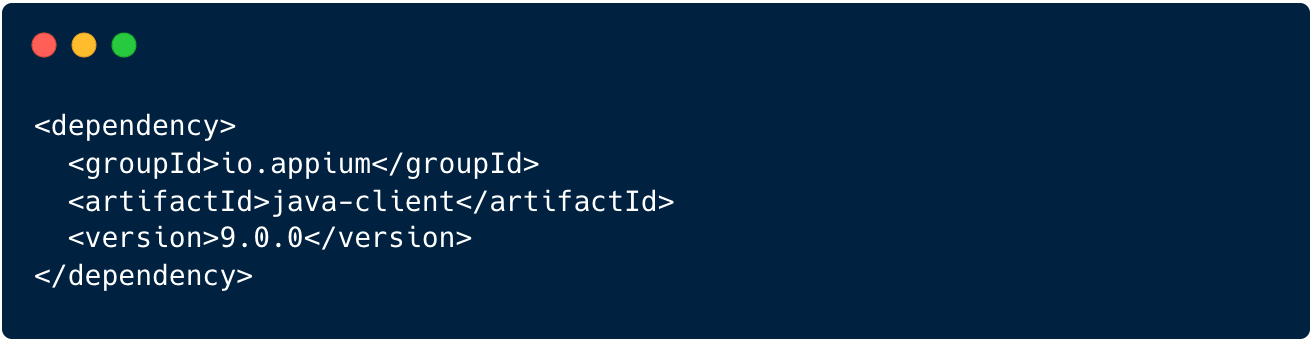
Install language bindings (e.g., Java client):
Configure your desired capabilities and drivers (e.g., UiAutomator2 for Android).
Setting Up an Emulator or Real Device for Testing
Android supports both emulators and physical devices. Emulators are ideal for CI environments and UI consistency checks, while real devices are better for assessing real-world performance, hardware-specific features, and final regression or exploratory testing.
Using Android Emulator:
- Open Android Studio
- Go to Tools → Device Manager
- Click “Create Device”
- Choose a device profile (e.g., Pixel 6)
- Select a system image (e.g., Android 13 or API 33)
- Download and launch the emulator
Using a Real Device:
- Enable Developer Options on the phone
- Turn on USB Debugging
- Connect the device via USB
- Run adb devices to check the connection
- Set the target in Android Studio or run tests via CLI
Running a Sample Test
Once your setup is ready, start with a simple UI test. Here’s an Espresso example:

To run the test in Android Studio, simply right-click the test class and select “Run.”
From the terminal:

Results are displayed in the Test Results tab of Android Studio or in the terminal output. Failed tests show the exact view matcher, step, and error.
How AI Enhances Android Test Automation
Android test automation has evolved from basic script-based checks to intelligent, adaptive systems.
As mobile apps grow in complexity and teams push for faster releases, artificial intelligence (AI) becomes a valuable ally, enhancing everything from test creation to maintenance and performance monitoring.
Here’s how AI is reshaping Android automation testing workflows:
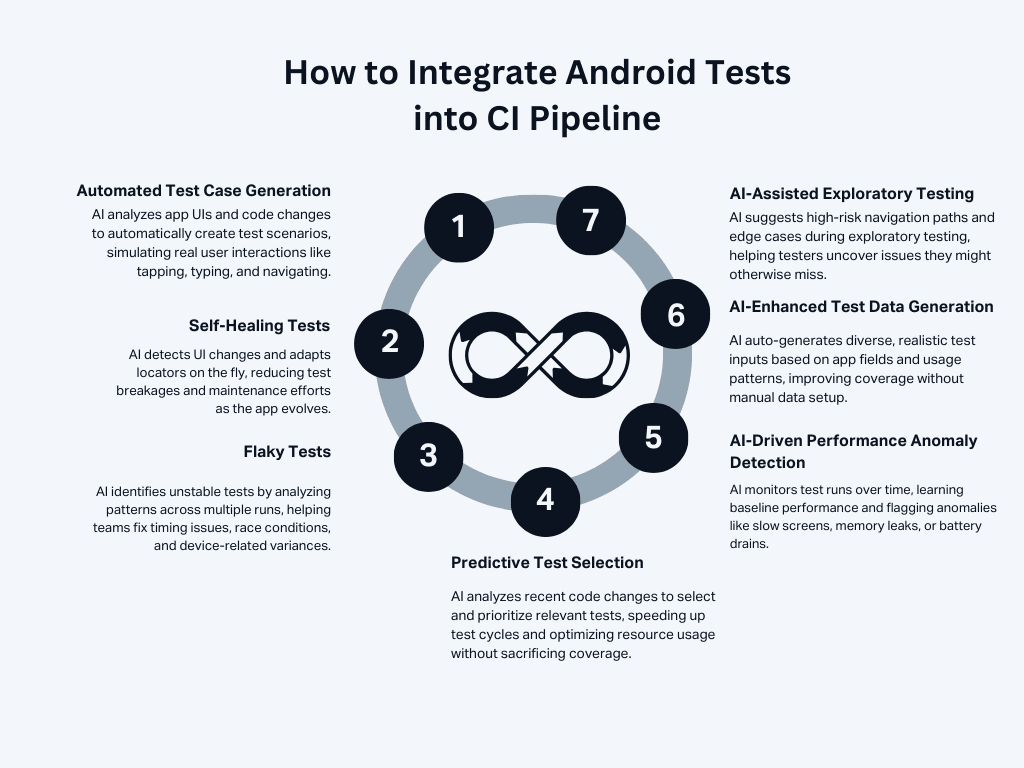
Automated Test Case Generation
Creating test cases manually for every feature, screen, and edge case is time-consuming. AI simplifies this process by analyzing your app’s UI structure, user behavior, or even recent code changes to generate test scenarios automatically.
For example, it can scan your app’s layout and simulate typical user interactions, such as tapping a login button, filling out a form, or navigating through tabs.
Self-Healing Tests
Android apps change frequently. IDs get updated, layouts shift, and UI elements are refactored, causing traditional tests to break.
AI addresses this problem with self-healing test capabilities. AI recognizes UI elements based on context and behavior, rather than static selectors like view IDs or XPaths.
When a UI changes, AI can automatically update the locators in your test scripts, preventing false negatives and reducing the need for constant maintenance.
Flaky Test Detection and Debugging
Flaky tests (those that pass sometimes and fail other times) are one of the biggest headaches in Android testing, especially for UI and integration tests. AI helps detect and resolve flakiness by analyzing test behavior over time.
It identifies patterns across multiple runs to flag inconsistencies and pinpoint root causes, such as timing issues, race conditions, or device-related variances.
Predictive Test Selection
Running every test on every build isn’t always practical. AI streamlines this by selecting only the most relevant tests for each change.
Using change impact analysis, AI evaluates recent code commits and determines which parts of the app are likely affected. It then prioritizes tests that target those areas.
This approach, often referred to as risk-based testing, protects high-risk features by avoiding redundant test execution.
As a result, you get faster builds, reduced infrastructure costs, and efficient test cycles without sacrificing quality.
AI-Driven Performance Anomaly Detection
Performance problems don’t always show up during functional testing.
AI adds an extra layer of performance assurance by monitoring test runs over time and detecting anomalies in speed, responsiveness, and resource usage.
It learns what “normal” looks like for your app and flags anything that deviates such as a slow-loading screen, memory leak, or battery spike.
AI-Enhanced Test Data Generation
Great testing starts with great data. It is, however, time-consuming to create diverse, realistic input data.
AI helps by analyzing your app’s input fields, usage patterns, and existing test data to automatically create meaningful test inputs.
AI simulates real-world usage scenarios with less manual effort, from filling out registration forms to stress testing search bars. It means more coverage, especially in places where traditional test cases fall short.
AI-Assisted Exploratory Testing
Exploratory testing is valuable for uncovering unexpected issues but often depends on the tester’s intuition and experience.
AI enhances this process by suggesting navigation paths, unusual user behaviors, or risky combinations of inputs based on previous test results and app structure.
It can surface edge cases or flows that human testers may overlook, making exploration more guided and efficient.
While humans still lead the effort, AI acts like a co-pilot amplifying your instincts with data-driven insights and helping you test beyond the obvious.
Challenges of Using AI in Android Test Automation
Despite its advantages, AI in Android auto testing isn’t without its limitations, which include:
- Data dependency: AI models require access to historical test data, code changes, or usage logs to be effective. Small teams or new projects may lack such resources.
- False positives: Overly aggressive healing or visual detection may misinterpret changes, causing test results to be unreliable.
- Tool maturity and cost: Many AI-powered testing tools are commercial and still evolving. Not all integrate smoothly with open-source Android frameworks like Espresso or UI Automator.
- Loss of control: Teams used to fine-grained test scripting may struggle with AI systems that “decide” how to test.
- Complexity of setup: Configuring AI tools to work with CI/CD pipelines, mobile devices, and local environments often takes extra effort and training.
Continuous Integration (CI) and Test Automation
For Android app development, automation alone isn’t enough. To fully support fast, high-quality releases, your tests must run automatically every time code changes. That’s where continuous integration comes in.
CI tools automate the build, test, and feedback process. Instead of waiting for someone to run tests manually, CI pipelines kick off tests as soon as code is pushed, merged, or updated.
This is especially valuable for Android projects, where device fragmentation and UI complexity can introduce hidden issues. Android development moves fast, especially in agile teams shipping frequent updates.
Without automation in CI, testing becomes a bottleneck. Here’s how CI adds value:
- CI runs your Android tests—unit, UI, or integration—on every code change. Developers get results fast, so issues don’t pile up.
- CI lets you test against different Android versions, screen sizes, and configurations using emulators or real devices in the cloud.
- CI helps catch regressions early—before they hit production.
How to Integrate Android Tests into a CI Pipeline
Setting up Android automation testing in CI is easy but requires the right tools and configuration. Here’s a basic flow:
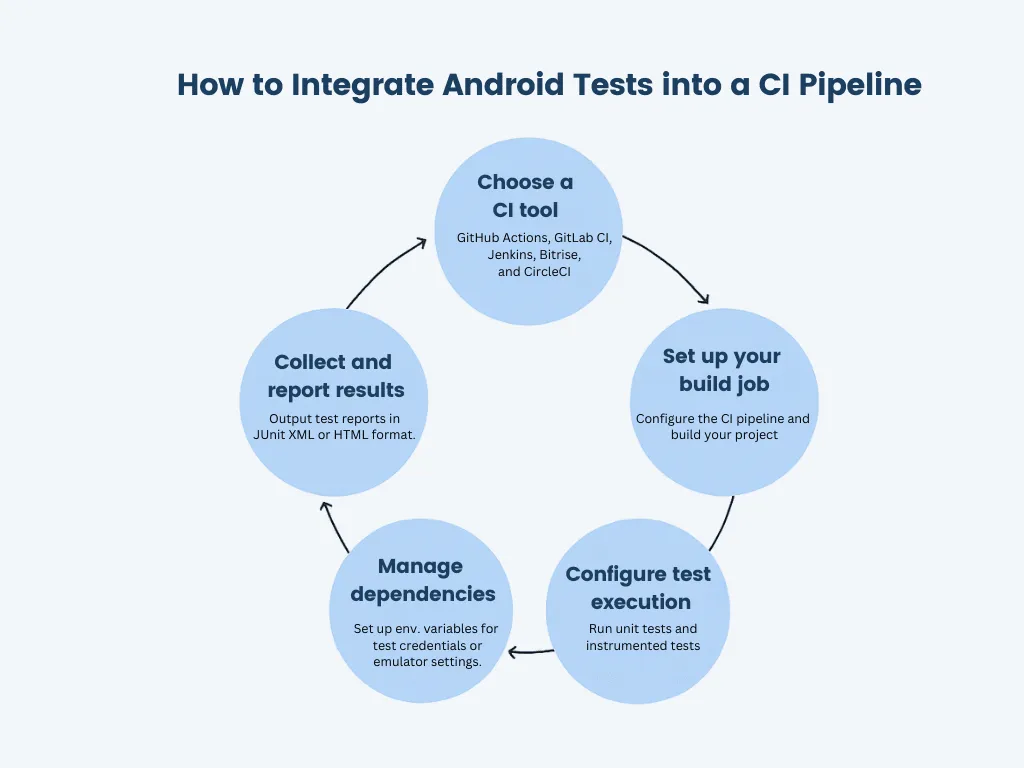
- Choose a CI tool: GitHub Actions, GitLab CI, Jenkins, Bitrise, and CircleCI all support Android workflows. Use one that fits your team and repo structure.
- Set up your build job: Configure the CI pipeline to install the JDK and Android SDK and build your project using Gradle (./gradlew assembleDebug).
- Configure test execution: Run unit tests with ./gradlew test and instrumented tests with ./gradlew connectedAndroidTest.
- Manage dependencies: Cache Gradle and SDK downloads to speed up builds. Set up environment variables for test credentials or emulator settings.
- Collect and report results: Output test reports in JUnit XML or HTML format. Most CI tools display results directly in the interface, highlighting failures and flaky tests.
- Fail builds on test errors: Set your CI jobs to fail if any test fails. This prevents broken code from being merged into main branches.
CI also lets you do more with less manual effort:
- Run tests on pull requests to catch issues before merging
- Schedule nightly regression runs to validate stability
- Split and run parallel test suites to reduce execution time
- Test across multiple API levels and screen sizes for broader coverage
Best Practices for Android Test Automation
A strong Android app automation testing strategy can accelerate releases, improve app stability, and reduce manual effort.
However, to achieve those outcomes, your approach needs to be intentional.
Below are best practices that help ensure your Android app automation testing is reliable, maintainable, and scalable.
Start with What Matters Most
You don’t need to automate everything at once. Start by identifying and covering your app’s most valuable and high-risk areas.
These are the paths that users rely on the most and where bugs can have the biggest impact.
Focus first on:
- Core user journeys (e.g., login, onboarding, checkout)
- Frequently used features across all app versions
- Modules with a history of bugs or regressions
- Areas with high business or financial impact
Write Small, Fast, and Isolated Tests
Test automation should support fast feedback and easy debugging. However, that can be difficult when tests are long, interdependent, or do too much at once.
To keep your tests efficient:
- Validate one behavior per test case
- Avoid chaining multiple test flows in a single script
- Use clear naming to describe the purpose of each test
- Reset the app state before each test to avoid shared dependencies
Structure Your Test Codebase Clearly
As your test suite grows, organization becomes critical. A well-structured codebase makes tests easier to find, reuse, and maintain.
Follow these structuring practices:
- Group tests by feature, screen, or module
- Separate unit, UI, and integration tests into distinct folders
- Reuse setup code, helpers, and data where possible
- Use naming conventions that reflect the functionality being tested (e.g., LoginFormTest, UserProfileFlowTest)
Run the Right Tests at the Right Time
Not every test needs to run on every commit. You’ll save time and resources by running only the relevant tests for a given change.
To manage test execution effectively:
- Tag tests using annotations (e.g., @Smoke, @Regression, @Critical)
- Use filters to run specific test groups in different environments
- Prioritize quick-running smoke tests for pull requests
- Schedule complete regression tests for nightly or pre-release builds
Keep Your Tests Up to Date
Outdated tests are worse than no tests—they create false confidence and miss real issues. As your app evolves, your test suite should too.
Maintain your tests by:
- Reviewing them regularly as part of your sprint process
- Refactoring old or redundant test cases
- Updating selectors when UI changes
- Removing tests that no longer align with business logic
Test Across Real Devices and Configurations
Android’s device fragmentation is a significant challenge. Your automation should reflect the diversity of real users.
Ensure broad device coverage by:
- Testing on a mix of screen sizes, OS versions, and manufacturers
- Using cloud-based device farms like Firebase Test Lab or BrowserStack
- Prioritizing devices based on usage analytics
- Including both emulators and physical devices in your strategy
Integrate Tests into Your CI/CD Workflow
Automation works best when it’s continuous. Running tests manually defeats the purpose and slows down development.
Make test automation part of your delivery pipeline by:
- Triggering tests on every commit or pull request
- Running separate jobs for unit, UI, and integration tests
- Automatically generating test reports and notifying the team of failures
- Using test results as a gate for deployment
Don’t Forget the Human Element
Automation can’t replace every aspect of testing—nor should it. Manual testing is still key in exploratory, UX, and usability testing.
Balance your efforts by:
- Using automation for stable, repetitive tasks like regression and smoke tests
- Conducting manual tests for new features, UI flows, and edge cases
- Using automation to free up testers for deeper, value-driven work
A hybrid approach gives you better coverage and better insights.
Final Thoughts
Android test automation is no longer a nice-to-have—it’s a necessity. With thousands of devices, rapid release cycles, and increasing user expectations, manual testing alone simply can’t keep up.
Automation brings the speed, consistency, and coverage needed to ship quality apps with confidence. But automation isn’t just about tools and code. It’s a mindset. Effective automation is built on strategy, structure, and collaboration.
It involves choosing what to automate first, writing reliable and maintainable tests, and keeping your test suite healthy as your app evolves. It also means combining automation with human insight, especially for exploratory or usability testing.
If you’re just starting, focus on what matters most: core user flows, high-impact features, and areas prone to regressions.
If you already have automation in place, optimize your pipelines, clean up flaky tests, and consider how AI can extend your coverage and efficiency.
As you continue to scale your testing efforts, having the right partner can make all the difference. Testlio is more than just a testing platform; it’s your partner in quality.
We combine human expertise with powerful automation to help you deliver flawless experiences across devices, geographies, and networks.
Whether you’re building native, hybrid, or cross-platform apps, our test engineers can integrate with your development pipeline, help select the right frameworks, write scalable test scripts, and ensure coverage across the entire Android ecosystem.
We also offer real-device testing, global crowd testers, and seamless CI/CD integrations—all backed by expert insights and actionable reporting.